Insights
K-12 School Security Self-Assessment: A Step-by-Step Guide
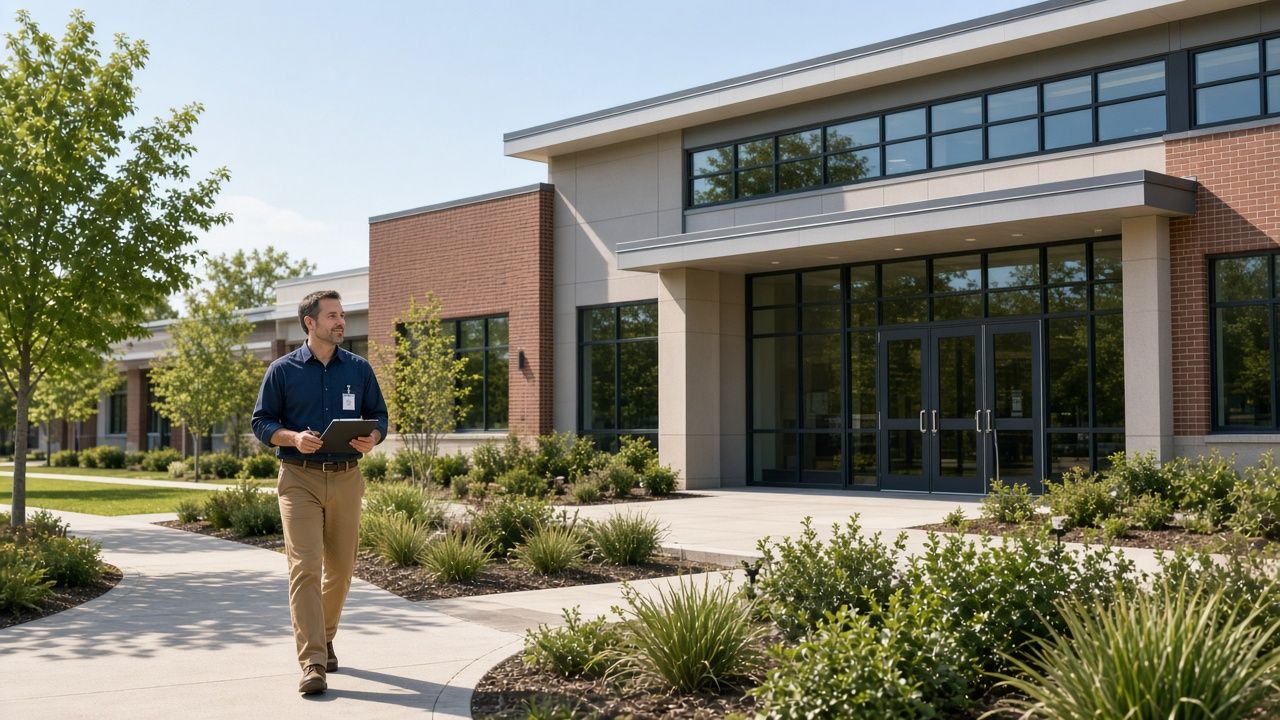
A vendor-neutral, section-by-section method for district and campus safety teams to evaluate and score their own safety posture.
Assessment time: plan on a half day per campus for the walk-through, plus document review. Who it's for: district safety directors, campus administrators, facilities leads, and the teams that support them.
How to use this guide
School safety improves fastest when a team can see, in plain terms, where it stands today and what to do next. This guide gives you a structured way to do that yourself. It walks through ten sections, from emergency planning to family reunification. Each section explains why it matters, gives a step-by-step walkthrough, and ends with a short checklist you can score. Add up the sections and you get a single score out of 100, a maturity band, and a prioritized list of next steps.
The method follows the same pattern professional security assessors use: build a picture of the site's context, review each protective layer, rate what you find against clear criteria, weight the results by importance, and turn the gaps into a prioritized plan. It draws on public frameworks, including CISA's K-12 School Security Guide and School Security Assessment Tool, the PASS Safety and Security Guidelines, federal guidance on school emergency operations plans, NFPA 3000, CPTED principles, the Secret Service NTAC threat assessment model, and state programs in Texas and Florida.
What this guide is not. It doesn't replace an assessment your state requires, such as the Texas safety and security audit or the Florida Safe Schools Assessment Tool. It isn't legal, fire-code, or engineering advice. Use it to prepare for those processes, to track progress between them, and to start useful conversations with your partners.
A note on confidentiality. A completed assessment describes where a campus is vulnerable. Keep completed scorecards and notes internal, and follow your district's and state's rules for protecting security information. Texas, for example, treats several categories of school safety monitoring documents as confidential.
The process at a glance
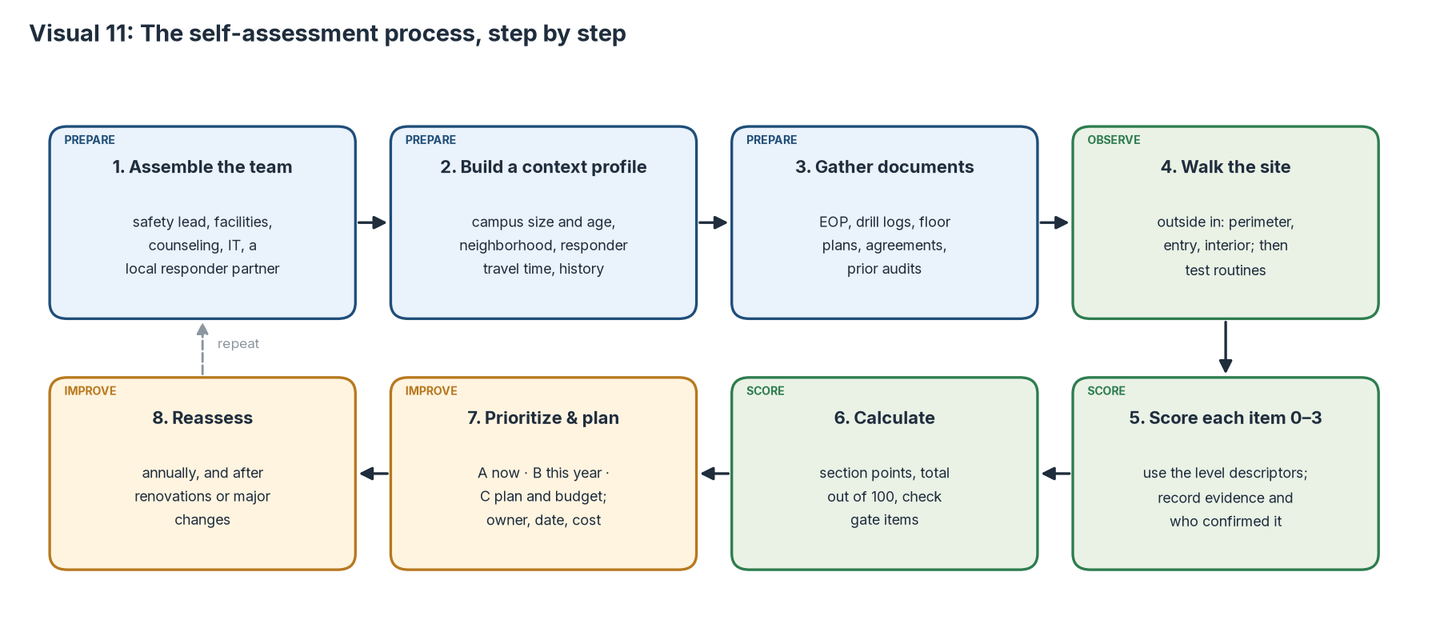
- Assemble a small team. Include a safety lead, facilities, a counselor or psychologist, IT, and, if possible, a local responder partner. Different eyes catch different things.
- Build a context profile (below). It isn't scored, but it tells you which sections matter most for this campus.
- Gather documents: the EOP, drill logs, floor plans, camera maps, agreements with partners, and prior audits.
- Walk the site from the outside in: perimeter, entry, interior. Then test routines such as visitor check-in, door checks, and PA reach.
- Score each checklist item 0–3 using the level descriptors. Write down the evidence and who confirmed it.
- Calculate section points, the total out of 100, and check the gate items.
- Prioritize and plan: give each gap a priority and an owner, a date, and a rough cost.
- Reassess each year, and after renovations, leadership changes, or a significant event.
Step 0: Build a context profile (not scored)
Professional assessments start by looking at the setting before the security measures. Answer these questions briefly. They don't change your score, but they shape which gaps you fix first.
| Context question | What to note |
|---|---|
| Campus profile | Grade levels, enrollment range, number of buildings and portables, building age and additions |
| Surroundings | Adjacent roads, rail, industrial sites, open fields, shared-use facilities |
| Natural and technological hazards | Flooding, severe weather, hazardous materials routes nearby |
| Responder proximity | Estimated travel time for law enforcement, fire, and EMS; on-site SRO or security staffing |
| History and current concerns | Past incidents, recent threats or reports, community tensions (facts only, from your records) |
| Community use | After-hours events, rentals, before- and after-school programs |
| People with access and functional needs | Students and staff who may need individual support in an emergency |
How scoring works
Every checklist item uses the same four-level scale, so the whole assessment converts cleanly into an online form later. Each section has six items, so a section's raw score runs from 0 to 18.
| Score | Level | General meaning |
|---|---|---|
| 0 | Not in place | Nothing exists, or it can't be located or demonstrated. |
| 1 | Initial | Exists informally or in part; not documented, not consistent, or depends on one person. |
| 2 | Established | Documented and in place at most sites and times; some gaps or overdue reviews. |
| 3 | Sustained | Documented, practiced, reviewed at least yearly, consistent across campuses, with evidence on file. |
- Score what you can show. If you can't point to a document, a log, or something you saw, score it lower and note what evidence would raise it.
- N/A is allowed sparingly. If an item truly doesn't apply (for example, portables at a campus that has none), mark it N/A. It drops out of that section's maximum.
- Gate items (marked ★) are foundational. If any gate item scores 0, the overall maturity band is capped at Developing, whatever the total.
- Score the typical day, not the best day. If the side door is locked during audits but propped most afternoons, score what usually happens.
Section 1: Governance and plans (weight 12)

Why it matters
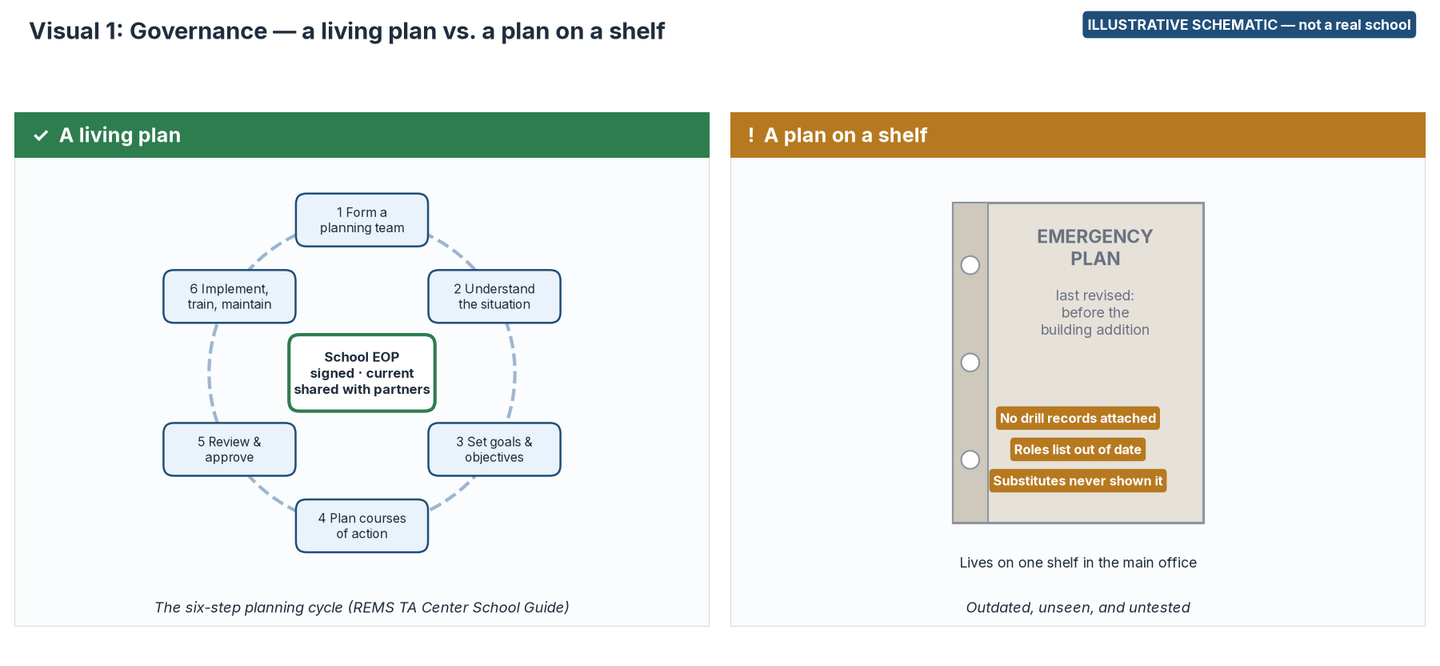
An emergency operations plan (EOP) ties every other measure together: who decides, who communicates, and what happens in the first minutes. Federal guidance from the REMS TA Center lays out a six-step planning process (form a collaborative team, understand the situation, set goals and objectives, plan courses of action, prepare and approve the plan, then implement and maintain it) that treats the EOP as a living document. Texas and Florida also build plan review into their required assessments.
Step-by-step walkthrough
- Pull the current EOP for the campus and the district. Note the date on the signature or approval page and who signed it.
- Compare its structure to the School Guide: a basic plan, functional annexes (for example evacuation, lockdown, shelter-in-place, accounting for all persons, communications, reunification, recovery), and threat- and hazard-specific annexes.
- List the members of the planning team. Check that community partners such as law enforcement, fire, EMS, emergency management, and mental health have a seat.
- Find the threat and hazard assessment that informs the plan. Record when it was done and which inputs it used (site assessment, culture and climate data, behavioral threat assessment trends, capacity).
- Confirm the plan covers people with disabilities and access and functional needs, before- and after-school programs, and after-hours events.
- Check how the plan is shared: classroom quick-reference guides, substitute folders, and current copies held by response partners.
- Look for the improvement loop: an annual review date and after-action items from drills or real events that were tracked to completion.
Checklist and scoring
Score each item 0–3. ★ = gate item.
| # | Item | 0 Not in place | 1 Initial | 2 Established | 3 Sustained | Score |
|---|---|---|---|---|---|---|
| 1.1 ★ | Current, approved multi-hazard EOP | No written EOP, or it cannot be found | Plan exists but is outdated or missing core annexes | Approved plan with core functional annexes; reviewed within the last two years | Signed plan reviewed within the last year, with functional and hazard-specific annexes aligned to the School Guide | |
| 1.2 | Collaborative planning team | No team | School staff only; meets when something happens | Includes administration, facilities, counseling or health, and at least one responder partner; meets yearly | Standing team with defined roles, responder and mental health partners, and a regular meeting schedule with notes | |
| 1.3 | Threat and hazard assessment drives the plan | None | Informal list of concerns | Documented assessment within the last three years | Documented, risk-prioritized assessment using several inputs; refreshed after major changes | |
| 1.4 | Access and functional needs addressed | Not addressed | General statement only | Specific procedures for students and staff with disabilities | Individual plans linked to the EOP and practiced in drills | |
| 1.5 | Plan is distributed and usable | Plan sits in one office | Full plan available, but no quick-reference guide | Quick-reference guides posted in classrooms | Quick-reference guides in classrooms and substitute folders; partners hold the current version | |
| 1.6 | Review and improvement loop | No review | Occasional edits | Annual review on the calendar | Annual review plus after-action items tracked to closure, with owners and dates |
Section 1 raw score: ____ / 18 → points = raw ÷ 18 × 12 = ____
Good practice vs. common gap
Good practice: The planning team meets each semester and includes the fire marshal, a school-based mental health lead, and the district's emergency manager. Every drill produces a short after-action note, and each improvement item has an owner and a due date.
Common gap: A thick binder in the main office, last revised before the building addition, that substitute teachers have never seen and that responders don't have.
Section 2: Perimeter and site (weight 8)
Why it matters
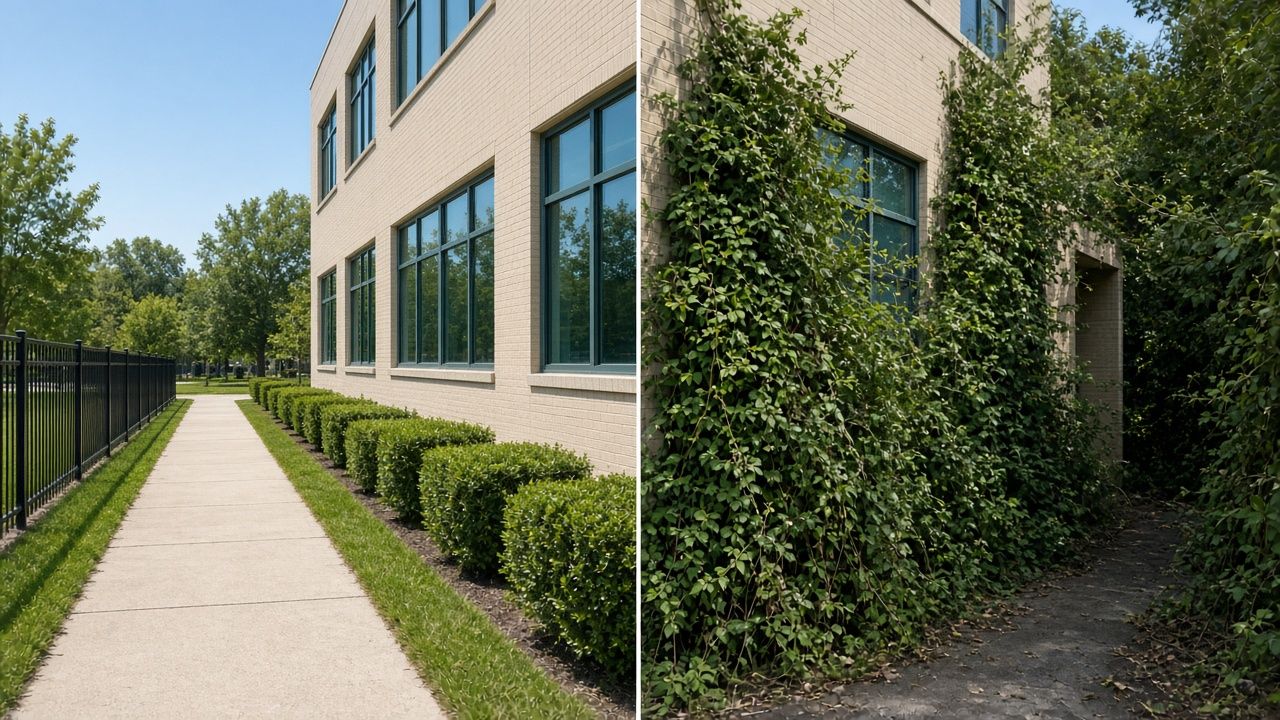
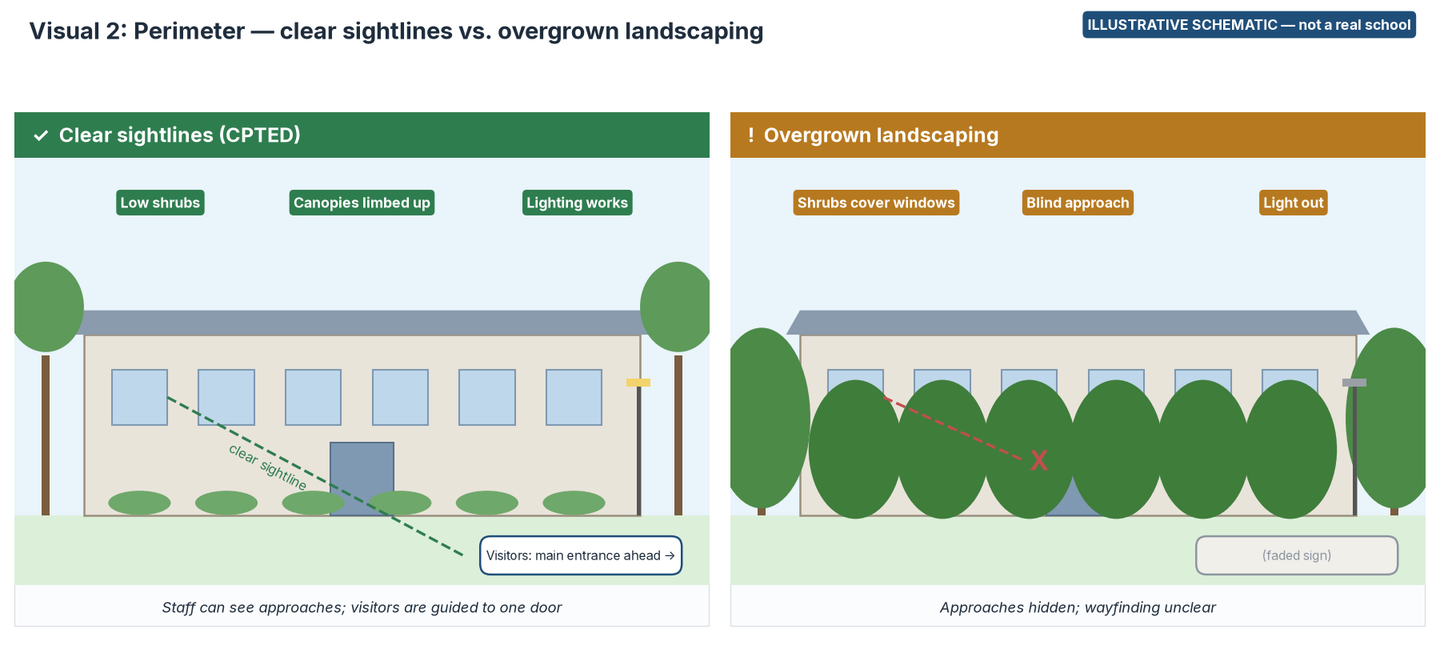
The site is the outermost layer of a school's protection. CISA's assessment tool organizes physical security into four layers (school perimeter, school grounds, building perimeter, building interior) and applies three strategies: detect, delay, and respond. Crime Prevention Through Environmental Design (CPTED) uses natural visibility (clear sightlines), natural access control, territorial reinforcement, and maintenance to guide people to the right place and make it easy for staff to notice what's out of place, without making the campus feel like a fortress.
Step-by-step walkthrough
- Start at the property line with a site plan in hand. Walk the full loop at arrival time, and again near dusk if you can.
- Mark every pedestrian and vehicle entry point on the plan, including informal paths through fences or fields.
- From the main office and a few classrooms, look outward. Note shrubs, trees, structures, or stored items that block views of approaches, parking, or play areas.
- Follow the signs as a first-time visitor would. Are you guided to one main entrance? Are boundary and visitor signs clear and in good condition?
- Check fencing and gates around play areas and courtyards: condition, whether gates are closed on schedule, and who is responsible.
- Watch arrival and dismissal. Look at how bus loops, family drop-off, staff parking, and walking routes are separated, and whether vehicles can get close to entrances or gathering areas without barriers such as bollards or planters.
- Record lighting outages, graffiti, litter, and broken fixtures, and check how quickly maintenance requests get closed.
Checklist and scoring
Score each item 0–3. ★ = gate item.
| # | Item | 0 Not in place | 1 Initial | 2 Established | 3 Sustained | Score |
|---|---|---|---|---|---|---|
| 2.1 | Defined boundary and controlled access points | Boundary unclear; many open approaches | Partial fencing or gates; not managed on a schedule | Boundary defined; gates managed during school hours | Boundary defined, gates scheduled and checked, and informal paths closed or designed out | |
| 2.2 | Natural visibility and sightlines | Approaches largely hidden from inside | Some sightlines; landscaping often blocks windows | Most approaches visible; landscaping on a trimming schedule | Clear views of approaches from the office and classrooms; low shrubs and limbed-up canopies kept that way | |
| 2.3 | Wayfinding to one main entrance | No visitor signage | Signs exist but are faded or inconsistent | Clear signs direct visitors to the main entrance | Consistent signs from the street to the door, plus boundary signs, all in good condition | |
| 2.4 | Traffic and parking separation | Buses, cars, and walkers mix | Some separation at peak times only | Bus, family, and pedestrian routes separated | Routes separated, staffed at peak times, and reviewed each year | |
| 2.5 | Vehicle standoff at entrances and gathering areas | Vehicles can reach entrances and crowds freely | Informal barriers (cones, signs) | Fixed barriers at the main entrance | Fixed barriers at entrances and key gathering areas, based on a documented review | |
| 2.6 | Exterior lighting and maintenance | Many outages; no routine | Repairs only when reported | Routine checks; most fixtures working | Scheduled inspections, quick repair turnaround, and graffiti and damage removed promptly |
Section 2 raw score: ____ / 18 → points = raw ÷ 18 × 8 = ____
Good practice vs. common gap
Good practice: From the front office, staff can see the drop-off loop and the main walk. Shrubs under the windows stay low, tree canopies are limbed up, and a single set of signs leads visitors from the street to the front door.
Common gap: Hedges have grown over the classroom windows, a light by the side lot has been out for weeks, and the only visitor sign has faded.
Section 3: Building entry and visitor management (weight 12)
Why it matters
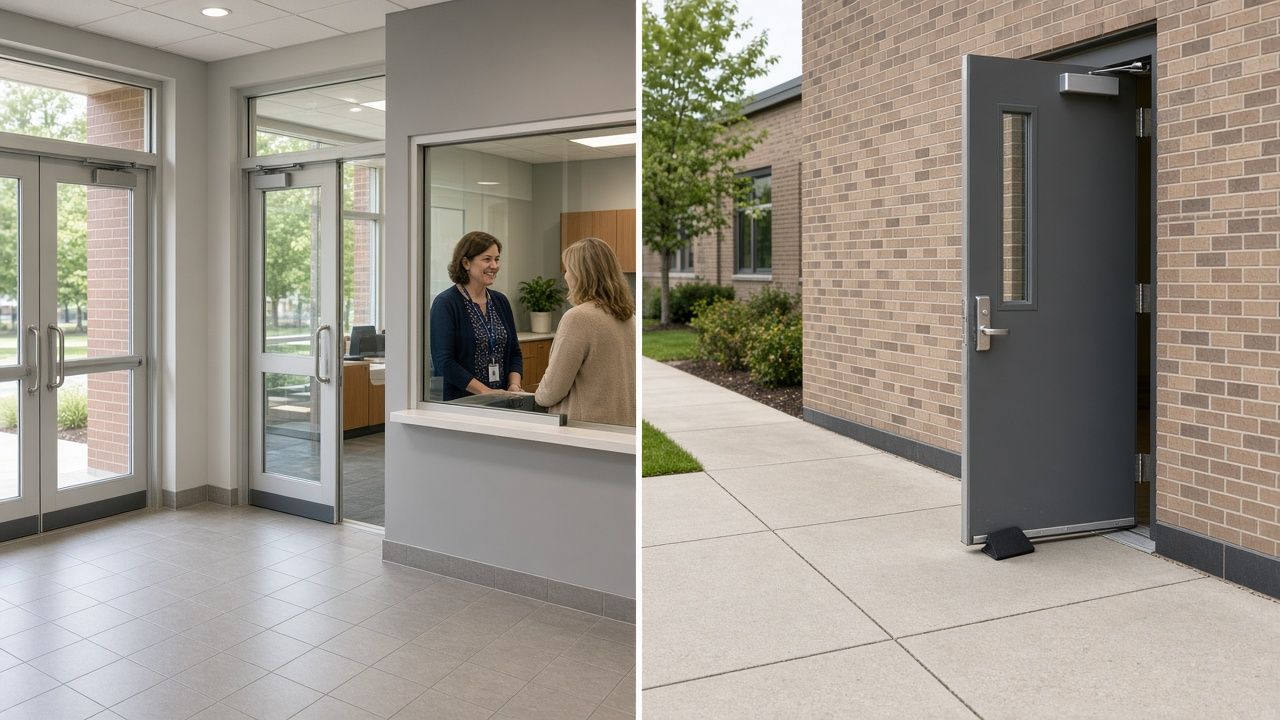
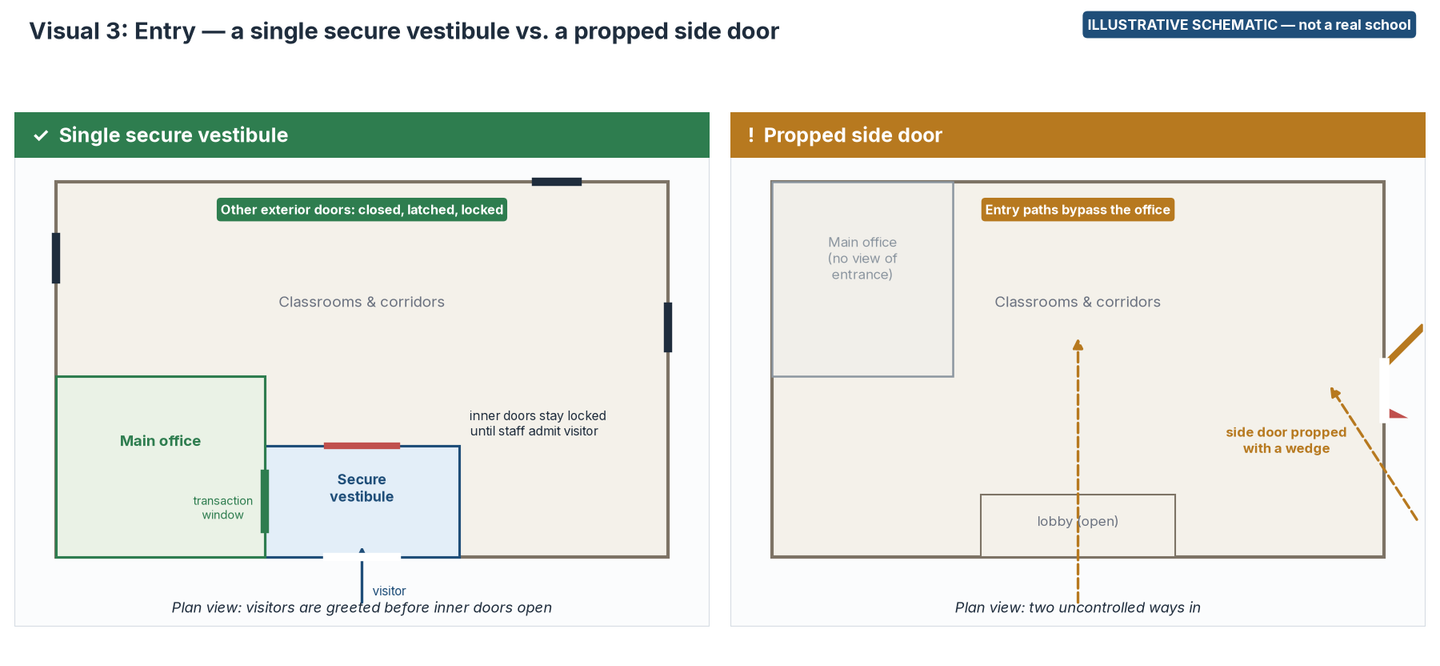
Controlling who enters the building during the school day is one of the most direct ways to reduce risk. Both CISA and PASS place access control at the building perimeter at the center of a layered approach. A secure vestibule, or an equivalent screening point, lets staff greet visitors and confirm their purpose before anyone reaches classrooms.
Step-by-step walkthrough
- With an escort and permission, walk the building exterior during class time and check every exterior door: is it closed, latched, and locked?
- Look for propped doors, wedges, taped latches, and closers that don't pull the door shut.
- At the main entrance, see whether visitors are held in a vestibule or other space until staff admit them, and whether office staff can see people approaching.
- Run a test visitor through the full process: identification, sign-in, badge, escort or destination, and sign-out.
- Ask how deliveries, contractors, after-hours events, and before- and after-school programs get in.
- Review key and credential control: who issues them, how they're collected when people leave, and when the last key audit happened.
- Check how staff learn that a door has been left open, whether through door-position alarms, camera coverage, or scheduled door checks.
Checklist and scoring
Score each item 0–3. ★ = gate item.
| # | Item | 0 Not in place | 1 Initial | 2 Established | 3 Sustained | Score |
|---|---|---|---|---|---|---|
| 3.1 ★ | Single controlled visitor entrance during the school day | Several doors used by visitors | Main entrance preferred, but other doors are commonly used | One visitor entrance; others locked, with occasional lapses | One visitor entrance, consistently enforced, with clear signage and staff awareness | |
| 3.2 | Secure vestibule or equivalent screening point | Visitors walk straight into the building | Office near the entrance, but no hold point | Hold point with intercom or camera before inner doors release | Secure vestibule with a transaction window, intercom, and clear view of approaches | |
| 3.3 | Exterior doors closed, latched, and locked | Doors routinely unlocked or propped | Locked in principle; propping is common | Locked, with periodic checks | Locked, checked on a schedule, and propping addressed every time it's found | |
| 3.4 | Visitor management process | No sign-in | Paper log only | Identification, sign-in, and badge | Identification, sign-in, badge, escort or destination check, and sign-out, used for all visitors | |
| 3.5 | Key and credential control | Unknown who holds keys | List exists but is outdated | Current list; keys and cards collected when people leave | Regular audits, quick deactivation, and restricted master keys | |
| 3.6 | Awareness of propped or held doors | No way to know | Noticed by chance | Scheduled door checks | Door-position alerts or camera coverage on exterior doors, with a set response |
Section 3 raw score: ____ / 18 → points = raw ÷ 18 × 12 = ____
Good practice vs. common gap
Good practice: Visitors press an intercom at the outer doors, show identification at a transaction window, and wait in the vestibule until office staff release the inner doors. Side doors stay locked, and a custodian checks them on a set route each morning and after lunch.
Common gap: The front entrance is controlled, but a side door near the gym is regularly propped with a wedge for convenience, creating a second, unmonitored way in.
Section 4: Classroom and interior (weight 12)
Why it matters
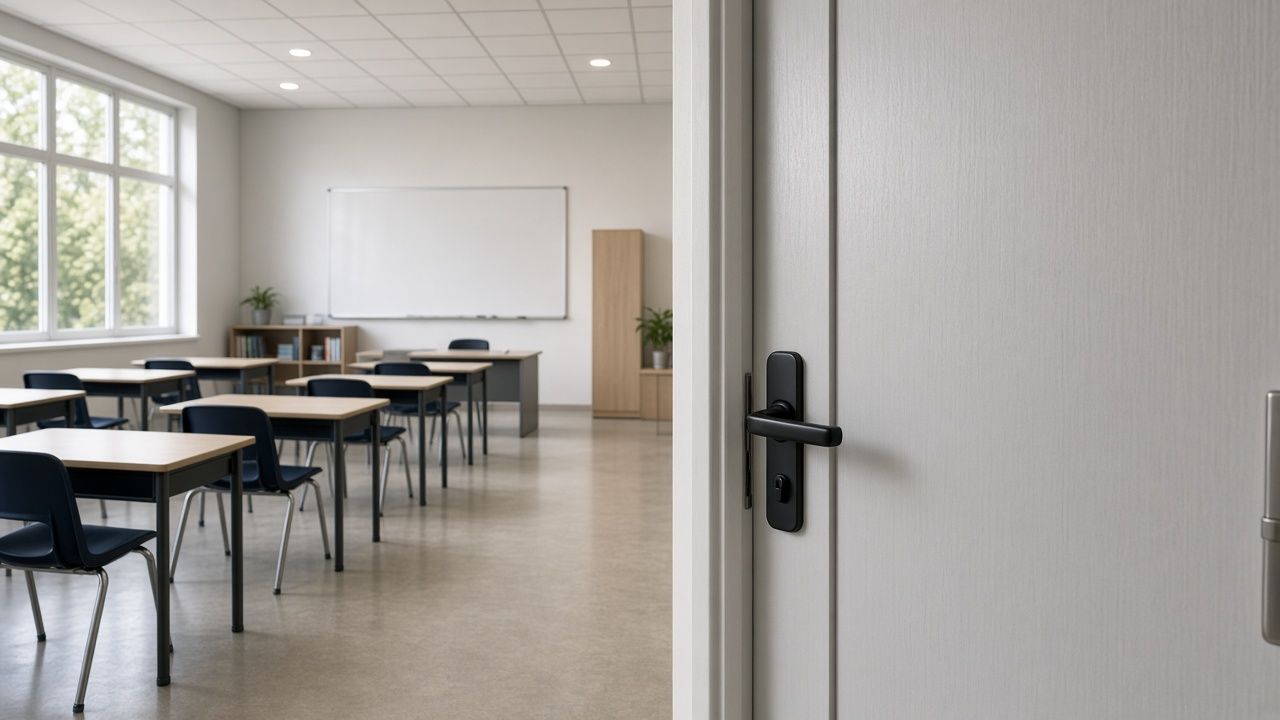
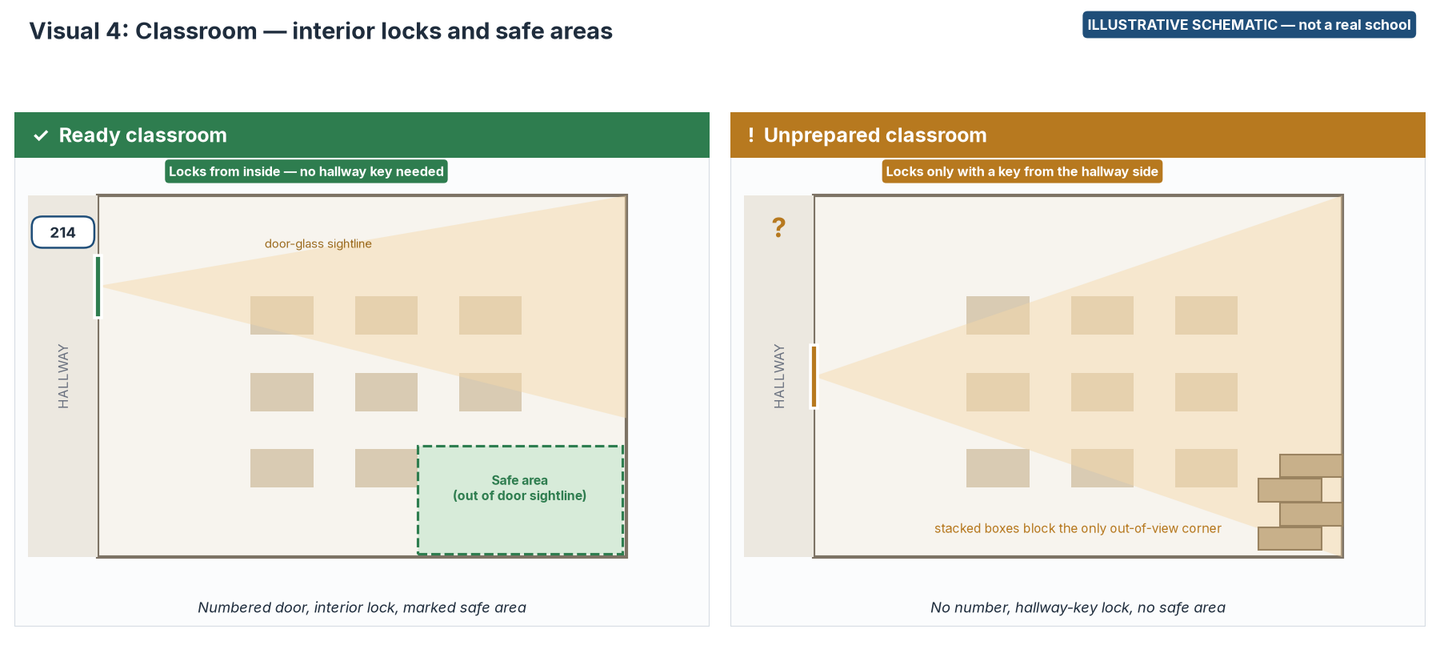
When an emergency calls for lockdown or shelter, the classroom becomes the protective space. PASS treats the classroom and interior as its own layer. Doors that lock from inside without stepping into the hallway, rooms that are clearly numbered, and safe areas planned in advance let staff act quickly and let responders find people.
Step-by-step walkthrough
- Sample classrooms on every floor and wing, and include portables, the gym, cafeteria, library, and offices.
- Test whether each door can be locked from inside without a key in the hallway. Check that doors are kept closed (and locked, if that's your policy) during instruction.
- Before changing any hardware, confirm with your fire marshal and code official that it meets fire, life-safety, and accessibility requirements. Avoid devices that haven't been approved.
- Check room numbering: consistent, visible from the hallway, matching the floor plan, and, where it helps responders, visible from outside on exterior windows.
- In each room, find a safe area out of the sightline from the door glass. Check for clutter and for window coverings that can be closed quickly.
- Review plans for large or open spaces (gym, cafeteria, auditorium, outdoor classes) and for portables.
- Check whether wings or floors can be closed off after hours for events.
Checklist and scoring
Score each item 0–3. ★ = gate item.
| # | Item | 0 Not in place | 1 Initial | 2 Established | 3 Sustained | Score |
|---|---|---|---|---|---|---|
| 4.1 ★ | Classroom doors lock from inside | Most doors can't be locked | Lock only with a key from the hallway side | Most doors lock from inside | All instructional spaces lock from inside, with hardware reviewed for code compliance | |
| 4.2 | Doors closed (and locked per policy) during instruction | No policy | Policy exists; rarely followed | Policy followed in most rooms | Policy followed consistently, with spot checks | |
| 4.3 | Consistent, visible room numbering that matches maps | No numbering standard | Numbers inside rooms only, or inconsistent | Numbers visible from hallways and matching floor plans | Numbers visible from hallways and, where useful, from outside; all match responder maps | |
| 4.4 | Safe areas identified and kept clear | Not identified | Teachers decide informally | Safe area identified in most rooms | Safe areas marked in every room, kept clear, and practiced in drills | |
| 4.5 | Plans for large spaces and portables | None | General guidance only | Written procedures for main large spaces | Written, practiced procedures for every large space, portable, and outdoor area | |
| 4.6 | Code-compliant hardware and approved devices | Unknown or unapproved devices in use | Mixed hardware; no review | Hardware reviewed by facilities | Hardware reviewed with the fire marshal; no unapproved devices in use |
Section 4 raw score: ____ / 18 → points = raw ÷ 18 × 12 = ____
Good practice vs. common gap
Good practice: Every classroom has a lever lock that turns from inside, a room number on the door and above it, and a taped-off corner that can't be seen from the door glass. Teachers practice moving to it during drills.
Common gap: Doors lock only with a key from the hallway side, rooms in the new wing aren't numbered yet, and the one corner out of view is used for storage.
Section 5: Camera coverage and monitoring (weight 8)

Why it matters
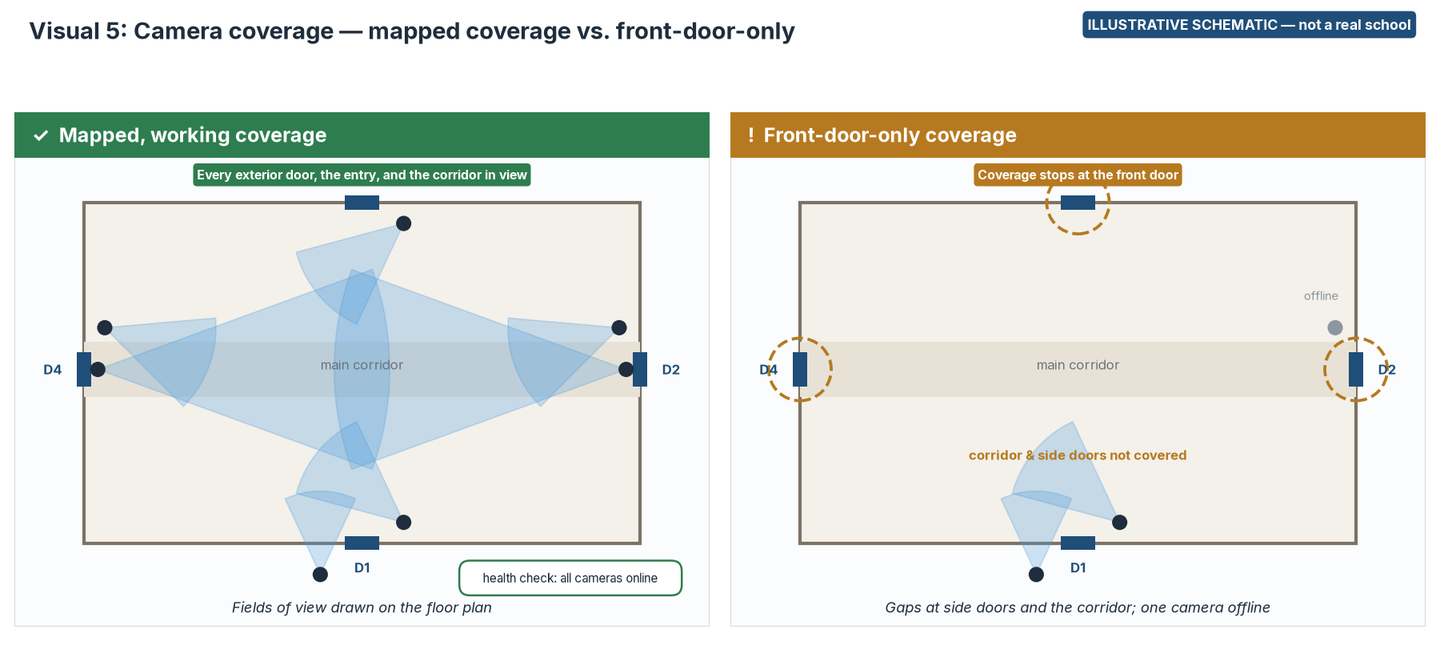
Cameras extend what staff can see, support investigations, and give responders a clearer picture of a situation. PASS includes cameras as a component across its layers, and CISA's guide treats them as one part of a detection system. Coverage only adds value when it's aimed at what matters, working, and someone knows how to use it in the moment.
Step-by-step walkthrough
- Get the camera list and draw each camera's location and field of view on the floor plan.
- Check coverage at every exterior door, the main entrance and vestibule, parking lots and bus loops, main corridors and stairwells, and common areas.
- Spot-check image quality in daylight and at night. Ask for the camera health log: how do you know when a camera goes offline?
- Ask who watches live video during the school day, where, and how they're notified that something needs a look.
- Review the retention, access, and privacy policy, including clear limits on coverage in restrooms and changing areas.
- Confirm whether responders can get live views or exported clips during an emergency, and whether that is written into an agreement.
Checklist and scoring
Score each item 0–3. ★ = gate item.
| # | Item | 0 Not in place | 1 Initial | 2 Established | 3 Sustained | Score |
|---|---|---|---|---|---|---|
| 5.1 | Coverage of entries, approaches, and key interior areas | Few cameras; no coverage map | Main entrance only | Most exterior doors and main corridors covered | All exterior doors, approaches, corridors, and common areas covered, documented on a map | |
| 5.2 | Camera health and image quality | Unknown how many work | Problems found by chance | Periodic checks | Automated or scheduled health checks with a repair turnaround target | |
| 5.3 | Live viewing roles and workflow | No one assigned | Viewed only after the fact | Named staff can view live video during school hours | Named staff, set locations, and a written workflow for what to do when something needs attention | |
| 5.4 | Timely awareness of events that need attention | Relies on someone happening to look | Occasional live viewing | Some automated notifications, reviewed by staff | Notifications reviewed by a person before the team acts, tuned over time to reduce noise | |
| 5.5 | Retention, access, and privacy policy | No policy | Informal practice | Written policy on retention and access | Written policy, access logs, and periodic review with legal and privacy stakeholders | |
| 5.6 | Responder access to live views or clips | Not possible | Ad hoc, by phone | Process exists for sharing clips | Written agreement for live views and clips, tested with partners |
Section 5 raw score: ____ / 18 → points = raw ÷ 18 × 8 = ____
Good practice vs. common gap
Good practice: Coverage is drawn on the floor plan and reviewed each summer. A weekly report flags any camera that went offline, and an assistant principal and the SRO know exactly where to view live video and what to do next.
Common gap: Cameras watch the front door well, but side doors and the main corridor aren't covered, and one exterior camera has been offline since spring.
Where tools like VOLT fit
Item 5.4 is about noticing things in time to act. Whatever approach your district uses, score it against the same checklist. For reference, here is how VOLT describes its role:
- VOLT is built to notice moments: a fall, a fight, someone where they shouldn't be.
- By default, a VOLT reviewer checks it before your team is notified.
- VOLT tracks a person by visual appearance across the camera footprint and shows that track on a 3D floor plan, so responders can see where a situation is now, not only where it started.
- VOLT is designed to work with most IP cameras you already have.
Section 6: Communications and alerting (weight 12)

Why it matters
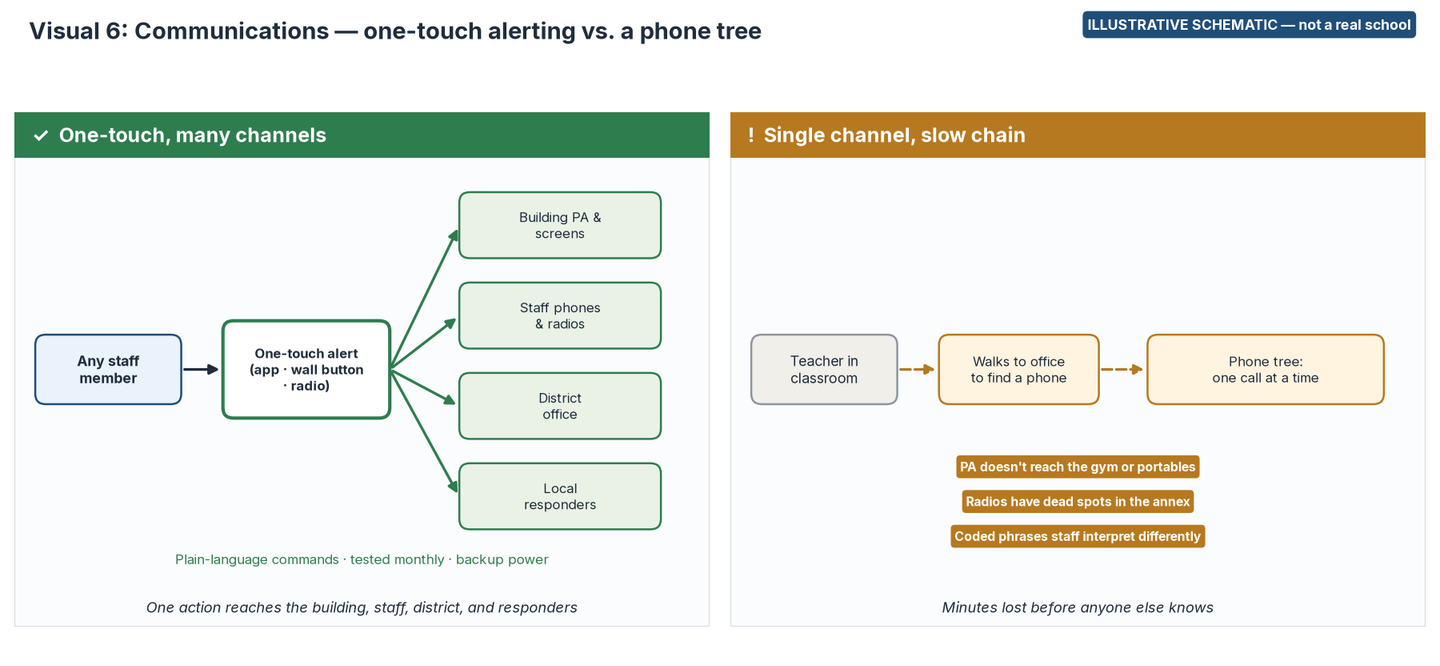
Fast, clear communication is what turns a plan into action. PASS lists communication as a core component in every layer, including public address, two-way intercoms, duress buttons, and mass notification. Some states now require specific capabilities: Florida's Alyssa's Law requires a mobile panic alert system in public schools, and Texas allows its school safety allotment to fund communications such as silent panic alert devices and two-way radios.
Step-by-step walkthrough
- Ask three staff members at random how they would alert the whole building and local responders right now. Compare their answers.
- Test the PA in every space, including the gym, portables, outdoor areas, and the cafeteria during lunch noise.
- Walk the building with a two-way radio and note dead spots. Check whether school radios can reach your SRO or responder partners.
- Review panic or duress alerting: where activation points are, who can trigger them, what happens next, and how often the system is tested.
- Check that emergency commands use plain language and are the same across the district.
- Review how families and the community are notified (text, email, app, website), who writes the messages, and whether templates are ready. Texas, for example, requires a district policy for notifying families about violent activity that includes text and email.
- Ask what happens if power, the phone system, or the network goes down.
Checklist and scoring
Score each item 0–3. ★ = gate item.
| # | Item | 0 Not in place | 1 Initial | 2 Established | 3 Sustained | Score |
|---|---|---|---|---|---|---|
| 6.1 ★ | Ability to alert the whole building quickly | No reliable building-wide alert | PA from the main office only | Alerts can be started from several places | Any staff member can start a building-wide alert from where they are, and it reaches every space | |
| 6.2 | Quick connection to local responders | Relies on finding a phone | Office landline only | Panic or duress alert in key locations | Mobile or fixed panic alerts available to staff, connected to local responders and tested | |
| 6.3 | Radio coverage and interoperability | No radios | Radios with known dead spots | Good coverage; limited link to responders | Full coverage, plus a tested link or shared channel plan with responders | |
| 6.4 | Plain-language, consistent commands | Codes vary or are unclear | Codes used; meanings vary by staff member | Plain language at most campuses | Plain-language commands used and practiced the same way district-wide | |
| 6.5 | Family and community notification | No process | Messages written in the moment | Templates and a notification tool exist | Templates, named spokespeople, multiple channels, and a tested process | |
| 6.6 | Redundancy and testing | Single system; never tested | Tested occasionally | Tested on a schedule | Tested on a schedule with backup power and a backup channel |
Section 6 raw score: ____ / 18 → points = raw ÷ 18 × 12 = ____
Good practice vs. common gap
Good practice: Any teacher can start a lockdown from a staff app, a wall button, or a radio. One action triggers the PA, staff phones, the district office, and a connection to local responders. The system is tested monthly, and commands are the same plain words at every campus.
Common gap: The PA doesn't reach the gym or portables, radios drop out in the annex, and teachers would have to walk to the office to find a phone.
Section 7: Behavioral threat assessment and reporting (weight 12)

Why it matters
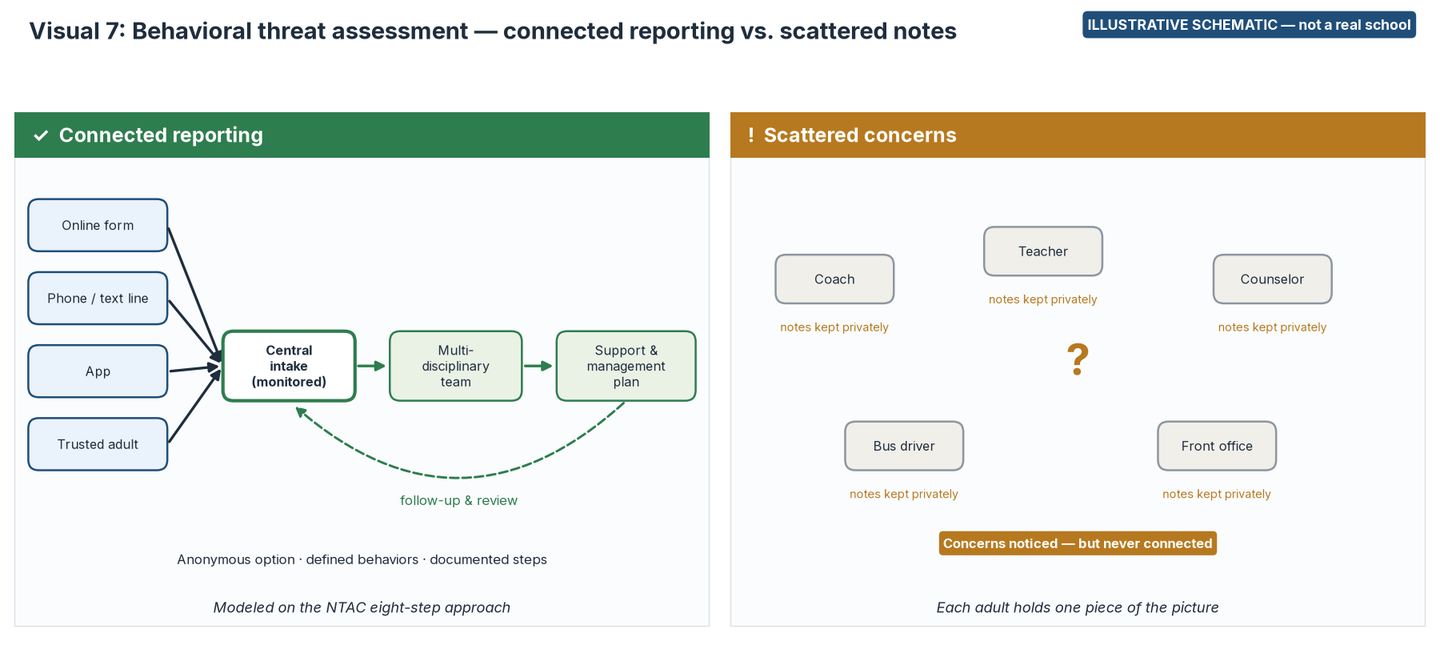
Most prevention happens long before anything reaches the front door. The U.S. Secret Service National Threat Assessment Center (NTAC) recommends an eight-step model in which a multidisciplinary team identifies students of concern, assesses risk, and puts support and management in place. NTAC's 2025 guidance connects this work with multi-tiered systems of support, and Texas requires a threat assessment and safe and supportive school team at each campus.
Step-by-step walkthrough
- Team: confirm a multidisciplinary team exists for each campus (for example an administrator, counselor or psychologist, teacher, and law enforcement partner), with named members and backups.
- Behaviors: check that the district defines prohibited behaviors that trigger immediate action and concerning behaviors that call for an assessment.
- Reporting: test each reporting channel (online form, phone or text line, app, trusted adult). Is there an anonymous option, and who monitors it, including after hours?
- Thresholds: confirm the written threshold for involving law enforcement.
- Procedures: review how assessments are documented, which information sources are checked, and how interviews are handled.
- Management: look for individual support and management plans and evidence of follow-up over time.
- Climate and training: check that students, staff, and families know what to report and how, and that the climate encourages it.
Checklist and scoring
Score each item 0–3. ★ = gate item.
| # | Item | 0 Not in place | 1 Initial | 2 Established | 3 Sustained | Score |
|---|---|---|---|---|---|---|
| 7.1 ★ | Multidisciplinary threat assessment team | No team | Administrator handles concerns alone | Team in place with defined members | Team with members and backups at each campus, meeting on a schedule, with training complete | |
| 7.2 | Defined prohibited and concerning behaviors | Not defined | Informal understanding | Written definitions | Written definitions shared with staff, students, and families | |
| 7.3 | Central reporting with anonymous option | No clear way to report | Reports go to whichever adult hears them | Central channel with an anonymous option | Several channels feeding one monitored intake, with after-hours coverage and promotion each term | |
| 7.4 | Documented procedures and law enforcement threshold | None | Steps exist in people's heads | Written procedures | Written procedures, a clear threshold for involving law enforcement, and consistent documentation | |
| 7.5 | Support and management plans with follow-up | No follow-up | Discipline only | Individual plans created | Individual plans with named owners, check-ins, and review until closed | |
| 7.6 | Safe climate and stakeholder awareness | No effort | One-time announcement | Annual awareness for staff and students | Ongoing awareness for staff, students, and families, with climate data reviewed |
Section 7 raw score: ____ / 18 → points = raw ÷ 18 × 12 = ____
Good practice vs. common gap
Good practice: Reports from the online form, text line, and trusted adults land in one monitored queue. The campus team meets weekly, uses a standard documentation template, and every support plan has an owner and a review date.
Common gap: A coach, a bus driver, and a counselor each notice something different about the same student, but no one connects the pieces.
Section 8: Training and drills (weight 8)

Why it matters
People do what they've practiced. The sixth step of the federal planning process, implementing and maintaining the plan, centers on training, exercises, and revision. NFPA 3000 includes annual exercise requirements and calls for shared incident management training, so schools and responders practice together. Calm, well-planned, age-appropriate practice builds confidence rather than anxiety.
Step-by-step walkthrough
- Collect the drill log for the last school year. Compare it with your state's required drill types and frequency.
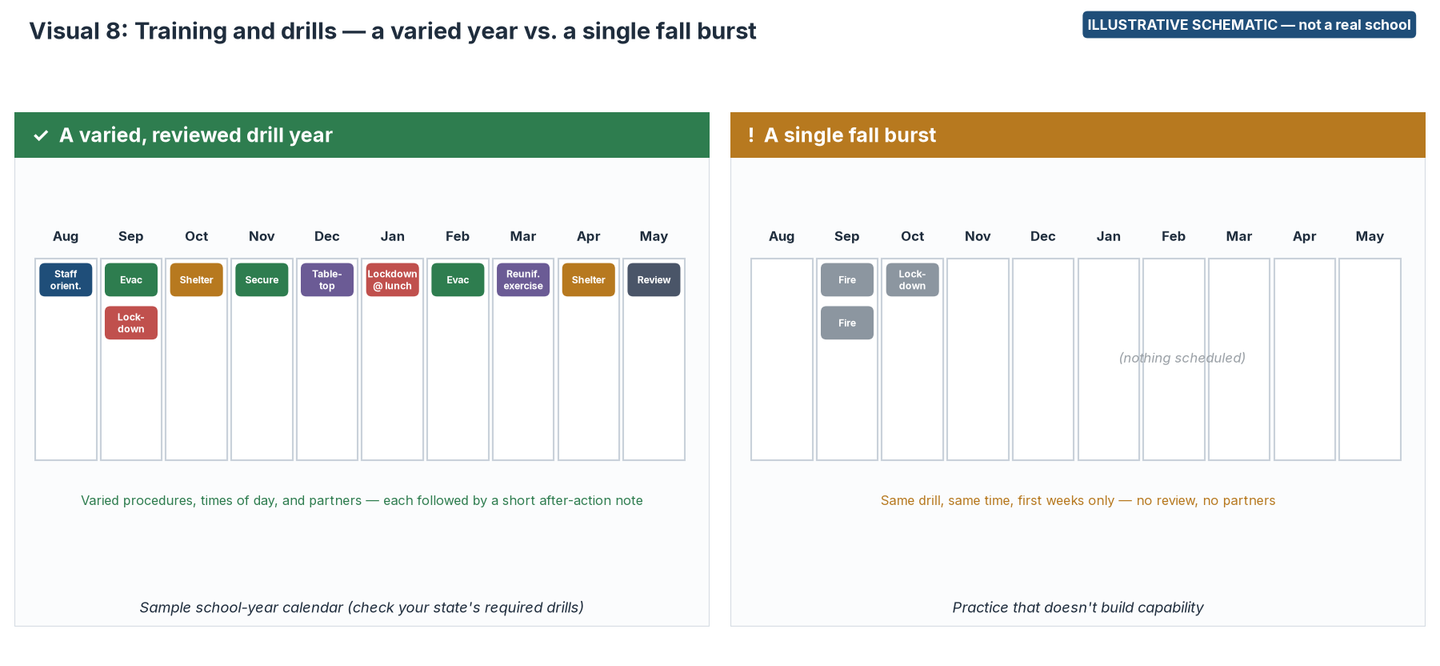
- Check whether drills cover several procedures (for example evacuation, lockdown, secure, shelter) and happen at different times of day, such as lunch, passing periods, and before or after school.
- Confirm that new hires, substitutes, coaches, bus drivers, and after-school staff receive an orientation to the plan.
- Look for tabletop or functional exercises with responders and district leadership.
- Read the after-action notes. Were the issues fixed?
- Review how drills are announced to students and families, and how younger students and students with disabilities are supported.
Checklist and scoring
Score each item 0–3. ★ = gate item.
| # | Item | 0 Not in place | 1 Initial | 2 Established | 3 Sustained | Score |
|---|---|---|---|---|---|---|
| 8.1 | Staff orientation, including substitutes and support staff | None | Teachers only, once | All regular staff yearly | All staff, substitutes, coaches, drivers, and after-school staff, with a record kept | |
| 8.2 | Drills cover required and relevant procedures | Few or none | Fire drills only | State-required drills completed | Required drills plus others matched to your hazard assessment | |
| 8.3 | Drills in varied conditions | Always the same time and place | Some variation | Varied times of day | Varied times, locations, and scenarios, including lunch, passing periods, and events | |
| 8.4 | Exercises with partners | None | Partners invited occasionally | Annual tabletop with partners | Tabletop and functional exercises with partners, building toward joint drills | |
| 8.5 | After-action reviews tracked to completion | None | Informal debrief | Written notes after drills | Written after-action items with owners and dates, reviewed by the planning team | |
| 8.6 | Age-appropriate, supportive approach | No consideration | Inconsistent | Guidance for age and ability | Clear guidance, family communication, and adaptations for students with disabilities |
Section 8 raw score: ____ / 18 → points = raw ÷ 18 × 8 = ____
Good practice vs. common gap
Good practice: Drills are spread across the year, cover several procedures, and include a lunchtime lockdown and a reunification tabletop with local responders. Each drill ends with a two-minute debrief, and the notes go to the planning team.
Common gap: Every drill happens in the first weeks of school, at the same time of day, with no review afterward and no partners involved.
Section 9: Partnerships with first responders (weight 8)
Why it matters
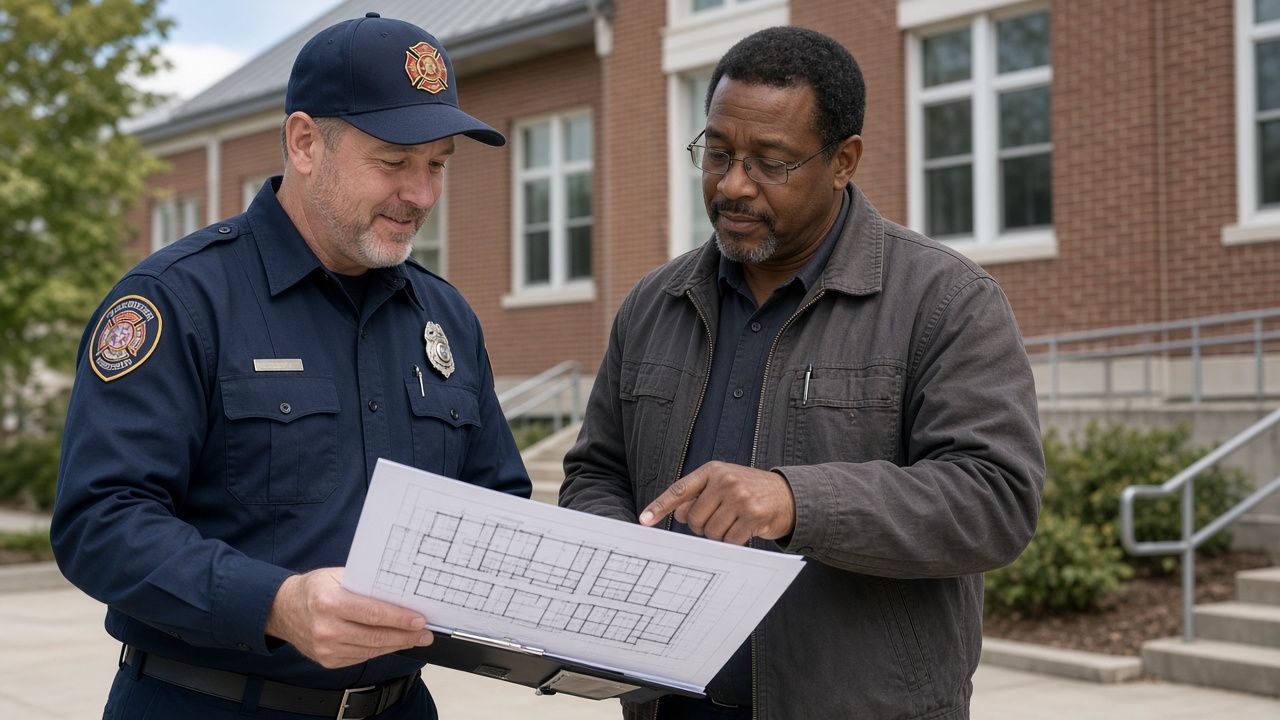
Responders arriving at an unfamiliar campus lose time working out where to go. NFPA 3000's 2024 edition calls for a multidisciplinary program committee, unified command at every active shooter/hostile event, and shared incident management training. Texas law now requires districts to give law enforcement and first responders accurate campus maps that follow state standards for site and floor plans, access control, and exterior door numbering, plus a chance to walk through each campus.
Step-by-step walkthrough
- Ask each responder agency which map of your campuses they have, how old it is, and whether they can open it in the field.
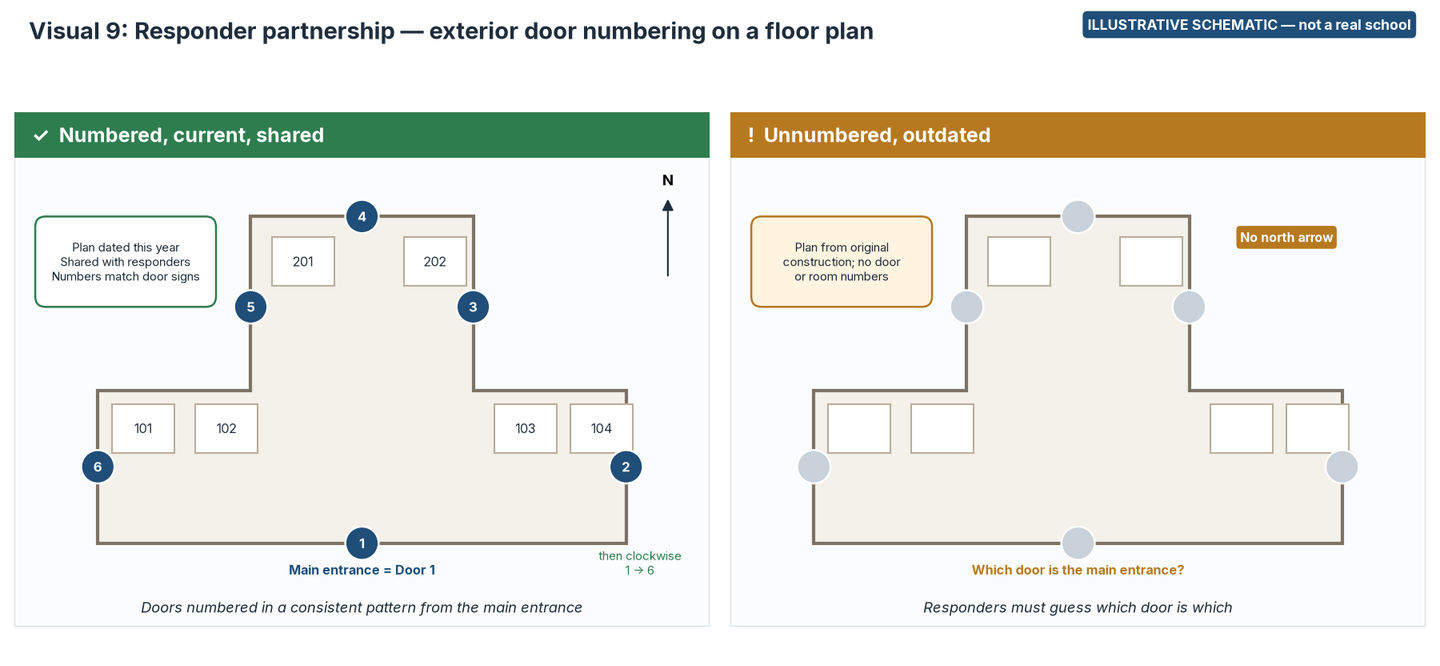
- Check the floor plans: room numbers match the signs, exterior doors are numbered in a consistent pattern (many districts start at the main entrance and go clockwise), and the plan shows a north arrow and the date.
- Walk the building exterior and confirm the door numbers are posted on the doors and visible from the street or parking lot.
- Review rapid entry for responders: a rapid-entry key box, access cards, or gate codes, and who keeps them current.
- Look for annual walk-throughs, plus pre-identified staging areas and command post locations agreed with responders.
- Review written agreements (for example a memorandum of understanding) covering roles, information sharing, and access to camera views.
Checklist and scoring
Score each item 0–3. ★ = gate item.
| # | Item | 0 Not in place | 1 Initial | 2 Established | 3 Sustained | Score |
|---|---|---|---|---|---|---|
| 9.1 ★ | Current maps and floor plans shared with responders | Responders have no maps | Outdated maps, or paper only | Current maps shared | Current digital maps shared with all relevant agencies and updated after every renovation | |
| 9.2 | Exterior door and room numbering visible and matched | No exterior door numbers | Numbered on plans only | Numbers on plans and doors | Numbers on plans and doors, visible from outside, in a consistent pattern district-wide | |
| 9.3 | Rapid responder access | No provision | Keys held by staff only | Rapid-entry key box or credentials at the main campus | Rapid entry at every campus, audited on a schedule | |
| 9.4 | Annual walk-throughs | Never | Occasionally, on request | Annual walk-through at most campuses | Annual walk-throughs at every campus, documented | |
| 9.5 | Joint planning: unified command, staging, and command post | Not discussed | Informal conversations | Staging and command post locations agreed | Agreed locations, unified command roles, and joint exercises | |
| 9.6 | Written agreements and information sharing | None | Verbal understanding | Written agreement with the primary agency | Written agreements with all relevant agencies, reviewed regularly |
Section 9 raw score: ____ / 18 → points = raw ÷ 18 × 8 = ____
Good practice vs. common gap
Good practice: Exterior doors are numbered on the floor plan and on the doors themselves, starting with the main entrance as Door 1 and going clockwise. The local police and fire departments have the current digital plan and walk the campus every summer.
Common gap: The only plan responders have dates from original construction, with no door or room numbers and no north arrow.
Section 10: Recovery and reunification (weight 8)

Why it matters
How a school reunites families and returns to learning shapes community trust for years. The REMS TA Center recommends a family reunification annex that covers before, during, and after an emergency. Florida's assessment tool must address family reunification plans, and NFPA 3000's 2024 edition stresses that recovery is a critical part of the response.
Step-by-step walkthrough
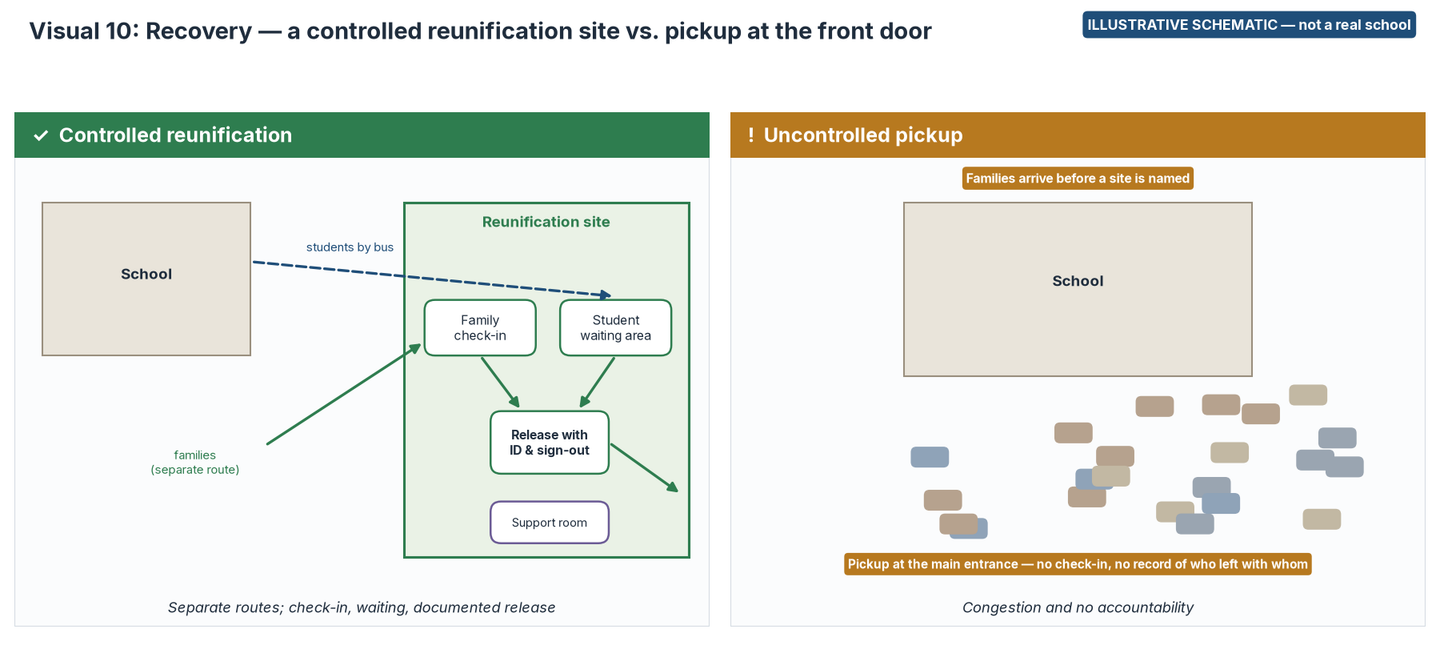
- Read the reunification annex. Confirm a primary and an alternate reunification site, with transport arrangements and written agreements with site owners.
- Check how students and staff are accounted for during an emergency: rosters, attendance tools, and how missing or extra people are reported.
- Walk through the release process: how authorized adults are confirmed, how identification is checked, and how each release is documented.
- Review family communication: how families learn where to go, what to bring, and where to wait.
- Look for mental health and recovery supports, such as psychological first aid, which the School Guide discusses, and arrangements with community providers.
- Check continuity plans: alternate sites for instruction, how records are protected, and how and when classes resume.
Checklist and scoring
Score each item 0–3. ★ = gate item.
| # | Item | 0 Not in place | 1 Initial | 2 Established | 3 Sustained | Score |
|---|---|---|---|---|---|---|
| 10.1 | Written reunification annex with primary and alternate sites | None | General statement only | Annex with a primary site | Annex with primary and alternate sites, transport plans, and written site agreements | |
| 10.2 | Accountability for students and staff | No method | Paper rosters, if available | Rosters and a reporting process | Real-time accountability tools and a practiced reporting process | |
| 10.3 | Controlled, documented release | Students leave with anyone | Informal checks | Release to authorized adults with ID | Separate check-in and release areas, ID check, and a record of every release | |
| 10.4 | Family communication and waiting area plan | None | Messages written in the moment | Templates and a designated waiting area | Templates, a family information area, and named staff roles | |
| 10.5 | Mental health and recovery support | None planned | Ad hoc | District counseling plan | Psychological first aid built into the plan, with community partners lined up in advance | |
| 10.6 | Continuity and return to learning | None | Informal ideas | Written continuity plan | Written continuity plan with alternate sites, records protection, and a phased return |
Section 10 raw score: ____ / 18 → points = raw ÷ 18 × 8 = ____
Good practice vs. common gap
Good practice: Families are directed to a separate reunification site by text and the district website. They check in at one door, students wait in another area, and each release is checked against authorized contacts and logged.
Common gap: Families arrive at the main entrance before a site has been named, and students are released without a record of who left with whom.
Scoring summary and maturity bands
Weights
Weights reflect how directly each section shapes outcomes in the first minutes of an emergency and in prevention. Planning, entry control, interior protection, communications, and threat assessment carry 12 points each. The other five sections carry 8 each. Total: 100. Districts can adjust weights to their context profile, but keep them summing to 100 and record the change so scores stay comparable year to year.
| Section | Weight | Gate item |
|---|---|---|
| 1. Governance and plans | 12 | 1.1 |
| 2. Perimeter and site | 8 | — |
| 3. Building entry and visitor management | 12 | 3.1 |
| 4. Classroom and interior | 12 | 4.1 |
| 5. Camera coverage and monitoring | 8 | — |
| 6. Communications and alerting | 12 | 6.1 |
| 7. Behavioral threat assessment and reporting | 12 | 7.1 |
| 8. Training and drills | 8 | — |
| 9. Partnerships with first responders | 8 | 9.1 |
| 10. Recovery and reunification | 8 | — |
| Total | 100 |
The formula
- Item score: 0, 1, 2, or 3 (or N/A).
- Section points = section weight × (sum of item scores ÷ (3 × number of scored items)). With six scored items, that's raw ÷ 18 × weight.
- Total = sum of section points, out of 100. Round to one decimal place.
- Band = from the table below, then apply the gate rule.
Maturity bands
| Band | Total | What it means | Typical next move |
|---|---|---|---|
| Foundational | 0–39 | Core elements are missing or informal. | Focus on gate items and the lowest-cost, highest-value fixes first. |
| Developing | 40–59 | Key pieces exist but are inconsistent or undocumented. | Standardize across campuses and close gate-item gaps. |
| Established | 60–79 | Documented, mostly consistent practice. | Strengthen testing, partner exercises, and after-action follow-through. |
| Advanced | 80–100 | Sustained, practiced, and reviewed. | Keep improving with exercises, data, and regular reassessment. |
Gate rule: if any gate item (1.1, 3.1, 4.1, 6.1, 7.1, 9.1) scores 0, the band is capped at Developing. This keeps a strong total from hiding a missing foundation. Like the PASS tier continuum, which asks every school to reach its baseline tier before moving on, the bands describe a progression, not a pass/fail grade.
Worked example (hypothetical campus)
The numbers below are invented to show the arithmetic. They don't describe any real school.
| Section | Weight | Raw | Points |
|---|---|---|---|
| 1. Governance and plans | 12 | 12 / 18 | 8.0 |
| 2. Perimeter and site | 8 | 10 / 18 | 4.4 |
| 3. Building entry and visitor management | 12 | 14 / 18 | 9.3 |
| 4. Classroom and interior | 12 | 9 / 18 | 6.0 |
| 5. Camera coverage and monitoring | 8 | 11 / 18 | 4.9 |
| 6. Communications and alerting | 12 | 13 / 18 | 8.7 |
| 7. Behavioral threat assessment and reporting | 12 | 8 / 18 | 5.3 |
| 8. Training and drills | 8 | 10 / 18 | 4.4 |
| 9. Partnerships with first responders | 8 | 6 / 18 | 2.7 |
| 10. Recovery and reunification | 8 | 7 / 18 | 3.1 |
| Total | 100 | 56.9 |
Total 56.9 → Developing. No gate item scored 0, so no cap applies. The lowest-scoring sections relative to their weight (first responder partnership, recovery, threat assessment) are where this team would start.
Turning gaps into a plan
For every item scored 0 or 1, assign one of four dispositions. This mirrors how professional assessments pair each finding with a mitigation priority:
| Priority | Meaning | Examples |
|---|---|---|
| A: Now | Highest consequence or a gate item. Fix now, with an interim measure until the permanent fix is in place. | Stop door propping with scheduled checks while door-position alerts are budgeted; share current floor plans with responders this month. |
| B: This school year | Important; fix as soon as time or resources allow. | Formalize the threat assessment team's documentation; add reunification site agreements. |
| C: Plan and budget | Meaningful but longer-term or capital-dependent. Reassess yearly. | Vestibule construction; vehicle barriers; radio coverage upgrades. |
| Accept with rationale | Documented decision that the current state is acceptable for now, with a review date. | A low-traffic gate left unlocked during staffed recess only. |
For each item, note the owner, the target date, a rough cost, and how you'll know it's done. Start with low-cost, high-value fixes. CISA's assessment tool also presents lower-cost, easier-to-implement measures first.
Designed to become an online assessment
Every element above maps directly to form fields, so the guide can become an interactive tool without changing the method:
| Field | Type | Rule |
|---|---|---|
| s{n}_i{m} (e.g., s3_i1) | Single choice: 0, 1, 2, 3, N/A | 60 items total; level descriptors shown as option labels |
| s{n}_i{m}_evidence | Short text | Optional; prompts "What did you see or check?" |
| s{n}_i{m}_priority | Single choice: A, B, C, Accept | Shown only when the item scores 0 or 1 |
| s{n}_points | Calculated | weight × sum ÷ (3 × count of non-N/A items) |
| total | Calculated | Sum of section points, 0–100, one decimal |
| gate_flag | Calculated | True if any of s1_i1, s3_i1, s4_i1, s6_i1, s7_i1, s9_i1 = 0 |
| band | Calculated | Band from total; if gate_flag, cap at Developing |
| context_* | Short text | Context profile answers; not scored |
Printable one-page scorecard
Print this page to record results for each campus, or download the printable versions:
- Download the full guide (PDF) — all ten sections, checklists and scoring, 55 pages.
- Download the printable scorecard (PDF) — one page per campus.
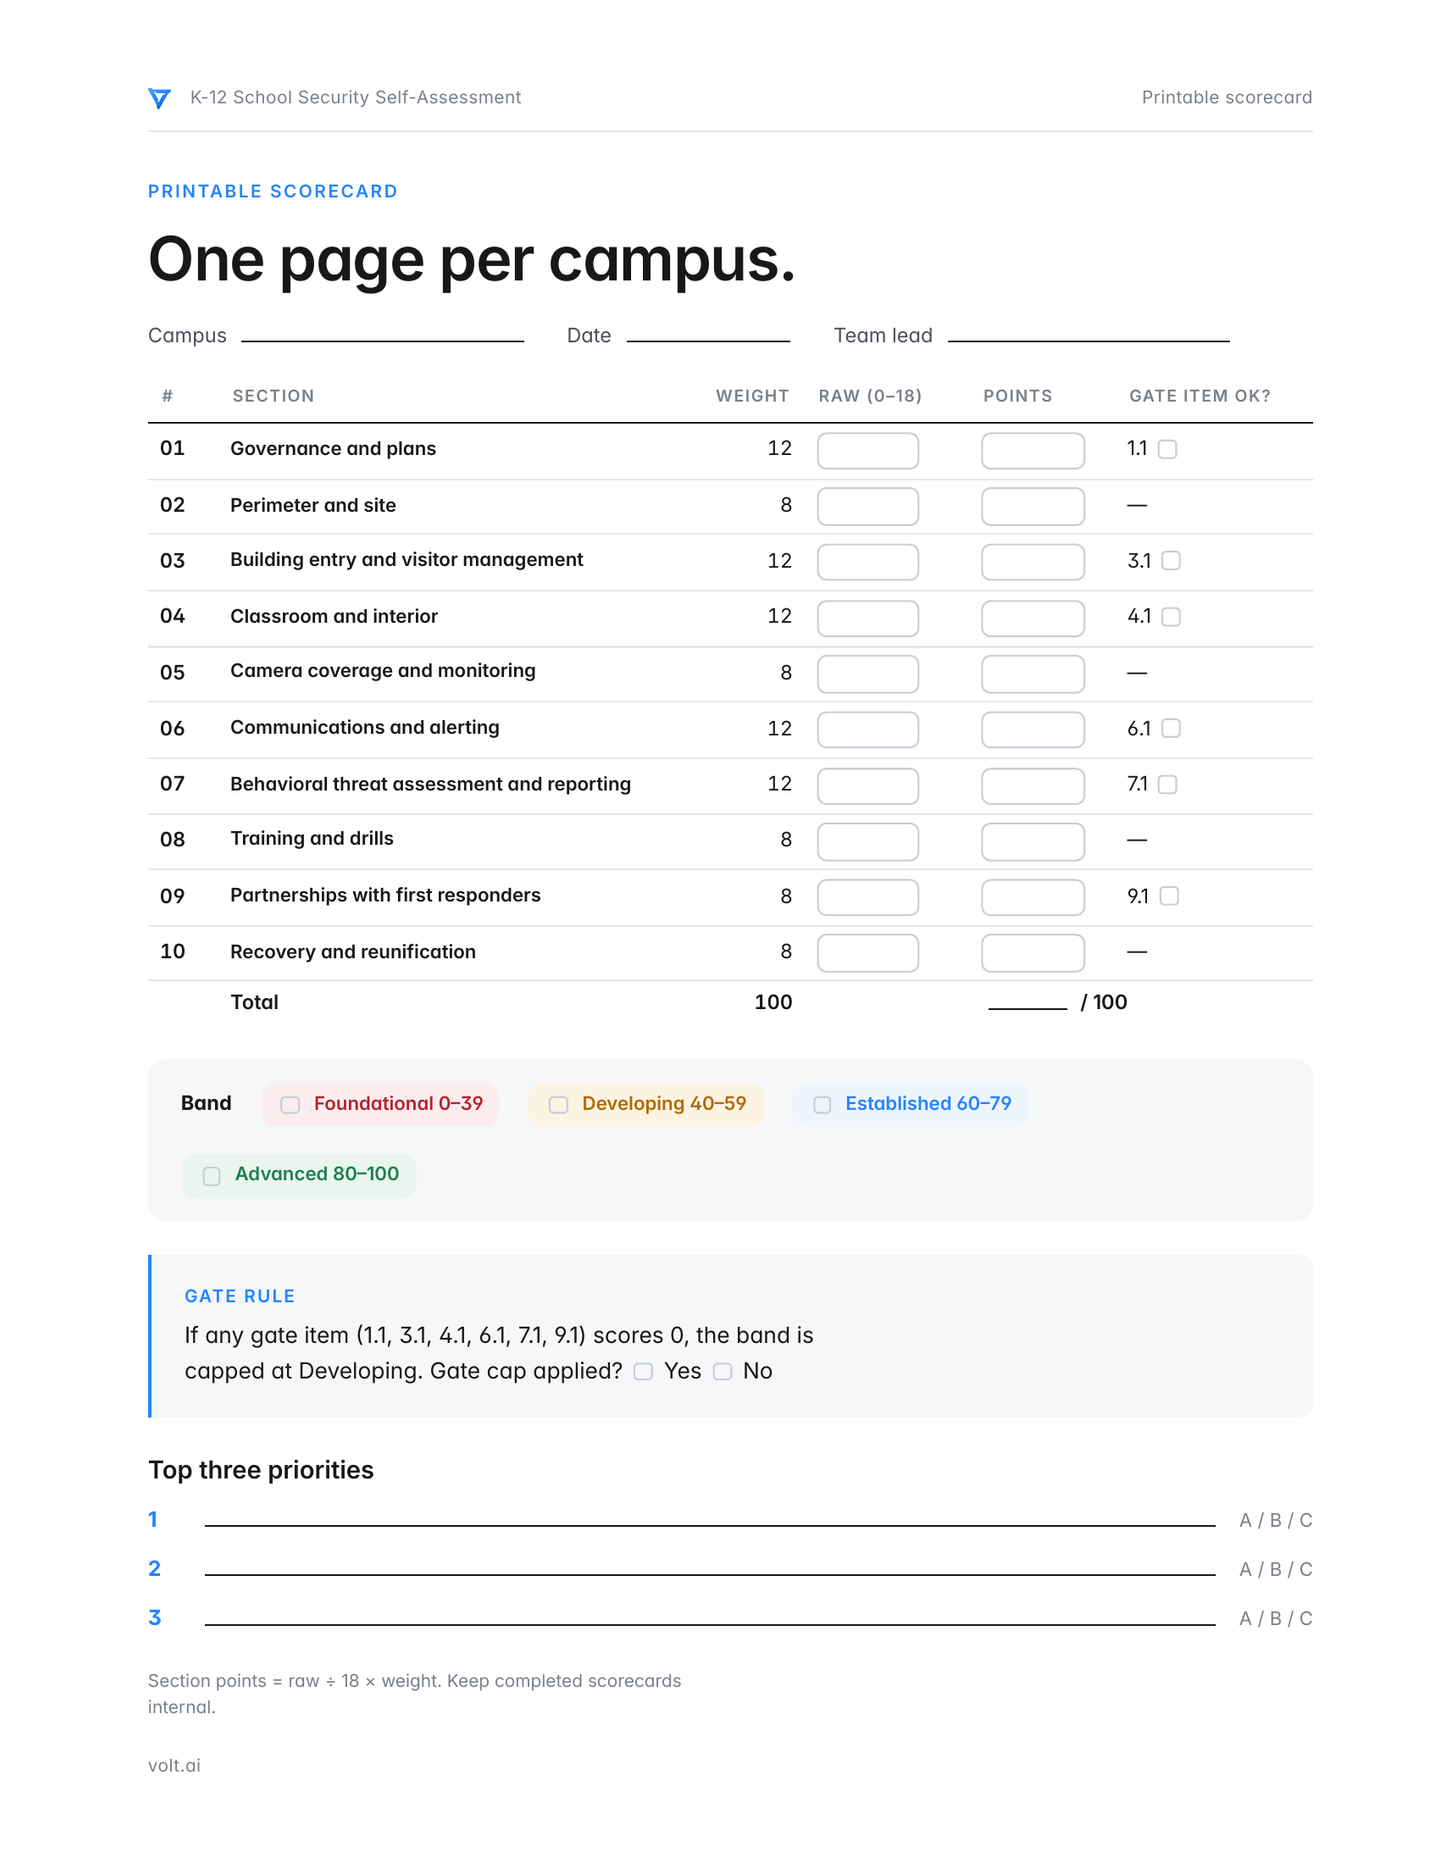
| # | Section | Weight | Raw (0–18) | Points | Gate item OK? |
|---|---|---|---|---|---|
| 1 | Governance and plans | 12 | 1.1 ☐ | ||
| 2 | Perimeter and site | 8 | — | ||
| 3 | Building entry and visitor management | 12 | 3.1 ☐ | ||
| 4 | Classroom and interior | 12 | 4.1 ☐ | ||
| 5 | Camera coverage and monitoring | 8 | — | ||
| 6 | Communications and alerting | 12 | 6.1 ☐ | ||
| 7 | Behavioral threat assessment and reporting | 12 | 7.1 ☐ | ||
| 8 | Training and drills | 8 | — | ||
| 9 | Partnerships with first responders | 8 | 9.1 ☐ | ||
| 10 | Recovery and reunification | 8 | — | ||
| Total | 100 | ___ / 100 |
Band: ☐ Foundational (0–39) ☐ Developing (40–59) ☐ Established (60–79) ☐ Advanced (80–100) Gate cap applied? ☐ Yes ☐ No
Top three priorities: 1. ______________________ (A/B/C) 2. ______________________ (A/B/C) 3. ______________________ (A/B/C)
Keep it going
The most useful assessment is the one you repeat. Score each campus, share the results with your planning team and responder partners, fix the A items first, and come back to it every year. Small, steady improvements in planning, entry control, communication, and practice add up to a campus that is ready for the moments that matter.
If camera coverage and monitoring is on your improvement list, the VOLT team would be glad to talk it through with you. VOLT is designed to work with most IP cameras you already have.
Talk it through with the VOLT team Request a demo
Sources
- CISA, K-12 School Security Guide (3rd ed., 2022) and School Security Assessment Tool
- CISA, School Security Assessment Tool (SSAT)
- Partner Alliance for Safer Schools (PASS), Safety and Security Guidelines for K-12 Schools, 6th ed. (2023)
- U.S. Dept. of Education et al., Guide for Developing High-Quality School Emergency Operations Plans (REMS TA Center)
- REMS TA Center, K-12 Emergency Management Planning (six-step process and plan content)
- REMS TA Center, Integrating Family Reunification Planning Before, During, and After an Emergency into the School EOP (fact sheet)
- U.S. Dept. of Education / REMS TA Center, Crime Prevention Through Environmental Design: Enhancing the Security of Your K-12 School Using an All-Hazards Approach (fact sheet, 2024)
- NFPA 3000, Standard for an Active Shooter/Hostile Event Response (ASHER) Program, 2024 ed.
- U.S. Secret Service NTAC, Enhancing School Safety Using a Threat Assessment Model (2018)
- U.S. Secret Service NTAC, Aligning Behavioral Threat Assessment and Management with a Multi-Tiered System of Support (2025)
- Texas School Safety Center, School Safety and Security Audit Toolkit (TEC 37.108)
- Texas School Safety Center, School Safety Law Toolkit: House Bill 3 (2023)
- Florida Statutes s. 1006.1493, Florida Safe Schools Assessment Tool (FSSAT)
- Florida Department of Education, Alyssa's Alert (mobile panic alert system)
This guide is an educational resource. It is vendor-neutral except where VOLT is named, and it doesn't replace state-required assessments, legal counsel, or review by your fire marshal and code officials. Photos and diagrams are illustrative and do not show real schools.